

First, we stamp 3 petals with a lot of ink.

Then, with a less ink, stamp the petals around the first 3.

Tune the whole shape with even less ink. Flower part is now completed.

Let's show you how to add leaves next, without ruining the image of the flower we have just created.
In order to prevent the flower and the leaves from overlapping, you need to take some green ink off the
leaf stamp below.
We use Kleenex to take lower half of the ink off, by tapping motion. Don't wipe off.

Just stamp around the flower. You can see how the green ink fades off and don't overlap with the flower image, can't you?

This is an easy, but useful technique!

 and wanted to personalize it by adding her and her husband name plus cheese (because they love wines and her husband likes cheese, she said). I had to re-position the wine bottle and glass to balance the whole design when names and cheese are added.
  Including cheese in the design worked pretty good to fill the empty space below the names.
 Making a pad with the Kleenex ball and a peace of Kleenex.
 Wetting the pad and taking some ink off the stamp by tapping motions.
  This is how the image looks like.
  Cleaning the stamp with wet paper towel.
  I tried with lighter ink to show more transparency of the glass bowl,
  but the impression was too weak.
  So, I added darker ink to the top and bottom of the stamp.
 Added a goldfish in the bowl.


 Pretty simple!
 I made this album as a gift for a friend whose house we are going to stay during this trip. Her daughter, Mei, is one of the reasons we visit St. Louis quite often lately; we went there twice last year. She is so adorable and funny that we never get bored of watching her. Whenever she started doing something, we grabbed a camera and kept taking photos. I had already made an album for myself using her photos and this is the second one. Here are some pages from the album.


 We are so excited to see her again. I wonder if I can sleep well tonight.
 Our friend, fishing Master Brian, took us to Lake Mille Lacs which was 15 minutes drive from the lake house and is about two hours drive up north from Twin Cities and one of the largest lakes in Minnesota. We drove on the lake and got to the fishing point, but not many people were ice fishing there.
 It seemed to be a little off season. When we visited this lake for ice fishing three years ago, we saw so many fishing houses that it was as if a city was build on the lake.
 We could see signs of fish on radar but the fish wasn’t very active that day.
 We tried different lake early next morning. Master Brian caught some but no luck for us. When we decided to leave, I found out my bait had already been taken. I kept fishing without bait!
  No wonder I didn’t catch any.
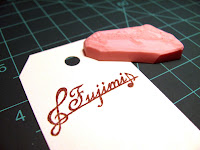 Whole stamp carving process is mostly fun, but creating a new design is sometimes frustrating. As the friend is a very good piano player, the theme of the design came up pretty quick. I drew some designs on the paper to visualize what's in my head; the name surrounded by some notes. However, they didn’t look pretty at all. I kept drawing and drawing and when I almost gave up, I finally ended up with this design.
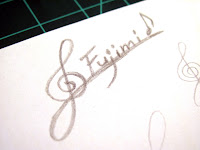 I changed the font and the position of the note. This is how the completed stamp looks like.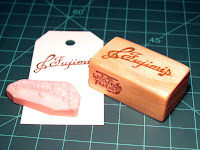


 We are going to NY, DC, and Niagara Falls for vacation soon. I’m already excited to make another travel album.

 This character is from the movie “Tim Burton's The Nightmare Before Christmas” released in 1993, a year before we came to the US. We didn’t know what Halloween was at that time, which was exactly like the main character in the movie “Jack Skellington” from Halloween town couldn’t figure out what Christmas was all about after visiting Christmas town accidentally. We were so fascinated by the movie when we watched it on video for the first time. The motion picture style was very eye catching, but what amazed us the most was that how rather a scary looking Sally looked more and more charming as the story progressed!
 Since my husband made this lampshade for me about 10 years ago, the projection of these Halloween characters have been rotating on the walls and the ceiling every year in this season. I set the lamp on the round maple table next to the bookcase where my Halloween collections are stored.
 I don’t usually illuminate this bookcase, but turning the room light off and watching my favorite Halloween collections and moving projection of Halloween characters make me so happy.
 I have finished one of the projects I have been working on. This is a custom order album from Stephanie. She wanted us to make a beach themed premade album she can scrapbook her family photos from their summer vacation in Bahamas. I used a heavy transparency sheet for the front cover, embellishing it with water splash 3D stickers. I used an ocean wave patterned paper under the front cover and cut out the part of waves in order to change the background by showing the following page.
 Because the envelopes I want to use on my projects are not on the market, I make them by myself. I just look for the envelope of the right size and make a template out of it.
 I glued a lace paper on a cardstock and sealed it with “Mod Podge”. My initial intention was to cut the cardstock to the right size, but a new idea flashed into my mind. Instead of cutting, I folded it to make a pocket which might hold unused photos, tickets or postcards.
 It has been a very fun process making this album. Photos on Stephanie’s Facebook helped me a lot. I even felt as if I had been to the beach while making it. Thank you very much for giving me an opportunity to share your memory keeping project.